The following sections describe how EnSim was used to generate map files for the watesheds within the McGill radar coverage for the "ENHANCED SHORT TERM FORECASTING OF EXTREME WEATHER" CFCAS project. http://www.cwrp.mcgill.ca/.
A watershed may be created from a Digital Elevation Model (DEM). The DEM must first be converted into an R2S file (a native EnSim format file). The watershed is created by selecting "File ... New ... New Watershed". This opens an empty watershed file. The R2S file must also be opened with "File ... Open". The R2S file is then dragged onto "Depressionless DEM". EnSim performs calculations to determine drainage directions at each node of the DEM, and calculates rivers.
However, the automatic algorithm to determine drainage directions may incorrectly predict drainage directions in flat terrain. When this happens, an area that should contain a separate river may drain into another river. This error is found by comparing EnSim's prediction of the river system to a topographic map or a digital river system.
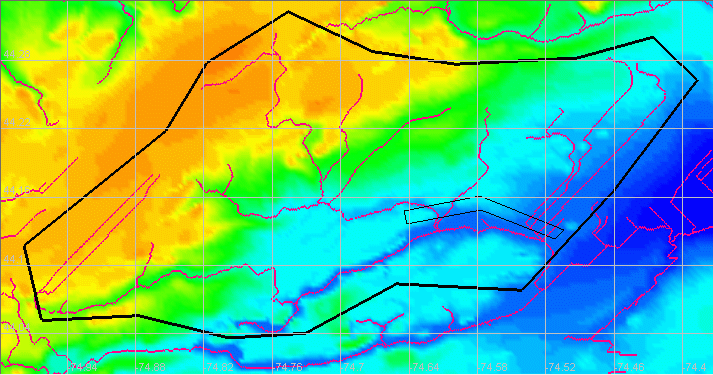
The area in Eastern Ontario is very flat, particularly near the Raisin River. In the figure below, a DEM was used to delineate the rivers. The highlighted area shows the Raisin, Beaudette, and Delisle Rivers. On a topographic map of the area, these are three separate river systems, that all drain into the St. Lawrence River. However, EnSim calculated that the drainage areas combined to create a single river system.
The DEM was corrected by either adding artificial "dams" to prevent the rivers from draining into one another or by adding artificial "ditches" to channel the rivers. The corrections must be performed on an R2S file (either the original DEM or the Depressionless DEM).
The "New Closed line" can be used to highlight an area, as shown in the figure below. When finished highlighting the area, EnSim will ask for a value for the Closed line. Enter the desired elevation for the dam. The R2S file must be highlighted, and then "Tools ... Map Object" should be selected, followed by the Closed line that was just created. This will set all the nodes within the Closed line equal to the value of the Closed line. In the case below, a value of 60 was chosen since the light blue colour corresponds to 60 m of elevation. When the corrected DEM is used to create another watershed, EnSim will route the water along the dam, and drain it into the St. Lawrence River.
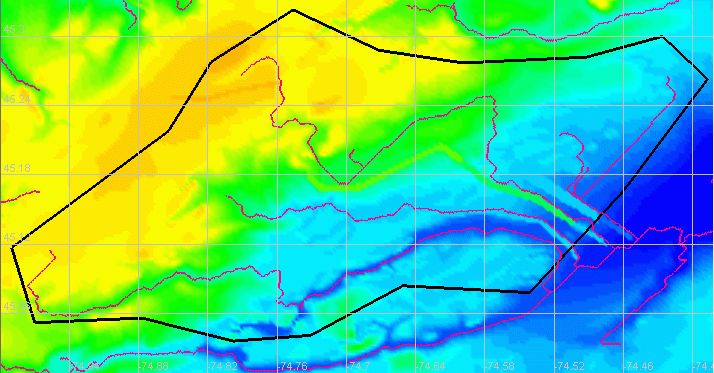
This correction and several others were performed on the DEM, and the resulting river system is shown in the figure below.
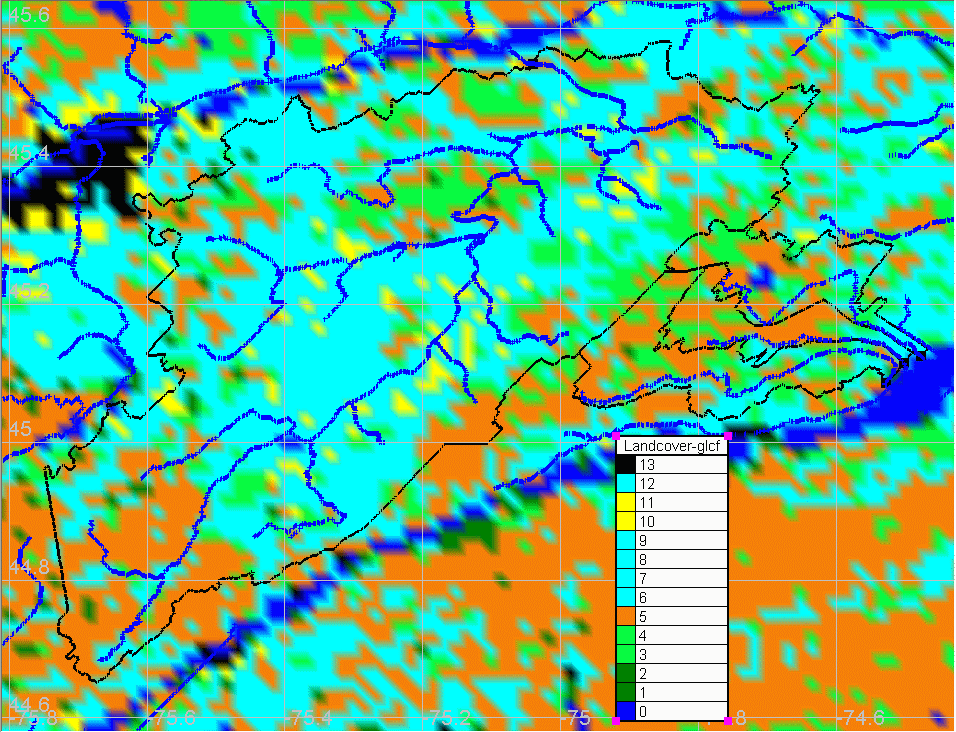
Ensim can also be used to view the landcover types. In the figure below, the numbers correspond to the following landcovers:
| Number | Landcover Name | Watflood Landcover Name |
| 0 | Water | Water |
| 1 | Evergreen Needleleaf Forest | Coniferous Forest |
| 2 | Evergreen Broadleaf Forest | |
| 3 | Deciduous Needleleaf Forest | Deciduous Forest |
| 4 | Deciduous Broadleaf Forest | |
| 5 | Mixed Forest | Mixed Forest |
| 6 | Woodland | Woodland |
| 7 | Wooded Grassland | |
| 8 | Closed Shrubland | |
| 9 | Open Shrubland | |
| 10 | Grassland | Low Crops |
| 11 | Cropland | |
| 12 | Bare Ground | (Does not exist in region) |
| 13 | Urban and Built-Up | Urban |
The rivers and watersheds were superimposed on a plot of the landcover. The resulting figure can be compared to a topographic map or other landcover information source. In this case, the "Mixed Forest" landcover (orange) corresponds closely to swamps and bogs on the topographic maps for this area. Therefore, the "Mixed Forest" landcover was re-classified as wetland, so that wetland routing could be used instead of river routing. (Wetland routing is slower than river routing.)
The automatic algorithm for calculating the drainage directions for the WATFLOOD grids is not always accurate when there are multiple, closely-spaced watersheds. The drainage directions should always be checked to ensure that the separate drainage areas are represented in WATFLOOD.
The figures below show a portion of the South Nation River basin with the Raisin, Beaudette, and Delisle Rivers. The Raisin River is the southernmost of the three rivers, the Beaudette River is in the middle, and the Delisle River is the northernmost river.
In the first figure below, the drainage directions were not set correctly at the boundaries of the drainage areas. Frequently, water drains from one drainage area into another, instead of out to the watershed outlet. The highlighted grid shows that water drains from the Beaudette River to the Delisle river, instead of to the outlet of the Beaudette river. In the second figure, this grid (and others) were altered so that each river system drains to its own outlet. (Note: when changing drainage directions, it is also necessary to check that the receiving grid's elevation is lower than the current grid's elevation, and change it, if necessary.)
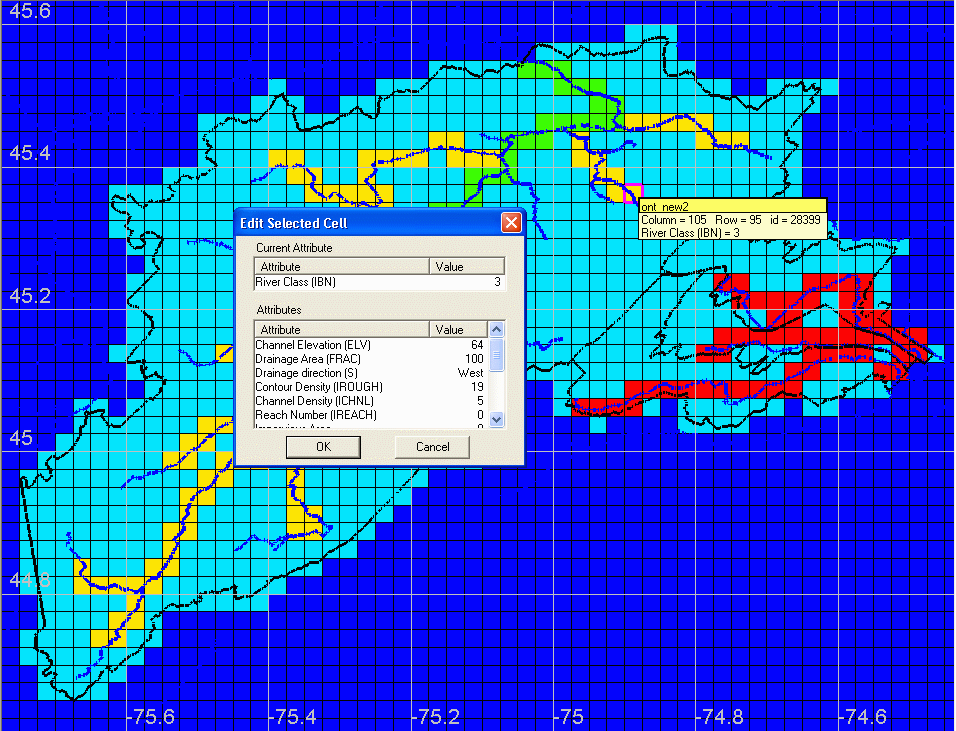
To edit a particular cell, double-click on the cell to highlight it. Then, right click on the cell and select "Edit Selected Cell" to pull up the edit menu. All of the attributes of that grid are listed, and changes may be made to any of the attributes.
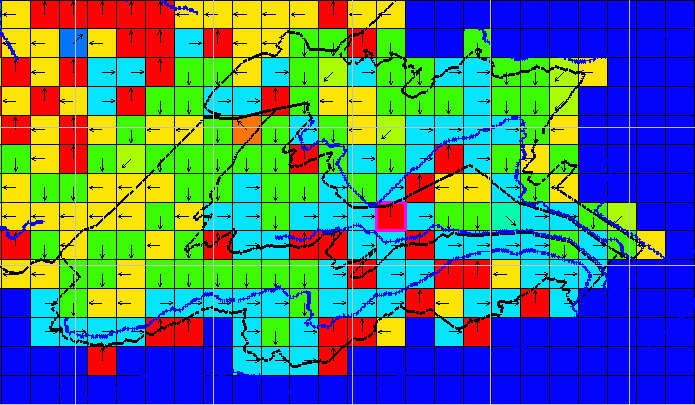 |
Part 1: The uncorrected drainage directions. The upper portion of the Beaudette River drains into the Delisle River (see highlighted grid). |
 |
Part 2: The corrected drainage directions. The drainage basins have been separated. |
EnSim sets all of the grids to a single river type. However, occasionally it is necessary to use multiple river types. For instance, the main stem of a river is often smoother than an off-channel grid, and therefore it has a lower Manning's "n". EnSim may be used to change the River Class attribute for the grids along the river.
In the figure below, there are four watersheds: the South Nation river (drains northward), and the Raisin, Beaudette, and Delisle Rivers (drain eastward). The main stem of the South Nation river was set to river class 2, while its major tributaries were set to river class 3. The other three rivers were set to river class 4. Off-channel grids were left as river class 1.
To edit a particular cell, double-click on the cell to highlight it. Then, right click on the cell and select "Edit Selected Cell" to pull up the menu shown below. All of the attributes of that grid are listed, and changes may be made to any of the attributes.